
Getting Started with the Core API
This tutorial demonstrates a simple use case for the Core API: you will create a contact via the API, and then update the contact you created. A contact in Front is a person or entity with whom you can communicate with via any supported Front channel (email, phone, social media, etc.).
In this tutorial, you will learn:
- How to obtain an API token for the Core API
- How to make API calls with the Core API to:
- Create a contact in Front
- Update the contact with custom fields
- Send attachments via the API in order to update the contact avatar
- Add additional handles to the contact
After completing this tutorial, you will be ready to build your own integration using the Core API endpoints.
Prerequisites
- If you don’t already have access to a Front account, create a developer account.
- (If you intend to use OAuth) Create an app and generate OAuth credentials for it. Refer to our OAuth guide for a detailed walkthrough of the OAuth authorization process. OAuth is required if you are creating a public integration for all Front clients, but is optional if you are creating an integration for private use.
Step 1: Obtain an API token
You have two options to obtain an API token with the Core API:
- Within Front
- Via OAuth
You can complete this tutorial with either option, so feel free to choose your own adventure. To learn about the authentication methods, refer to the Fundamentals topic.
The quickest method is to create an API token via Front, but if you are developing a public integration for all Front clients, note that you will have to use OAuth in your final integration.
Obtain an API token within Front
Refer to our API tokens tutorial to learn how to obtain a token via Front.
TipFor this tutorial, select Shared Resources for the scope. To learn about scope types, refer to the Fundamentals topic.
Obtain an API token via OAuth
Refer to our OAuth tutorial to learn how to obtain an API token via OAuth.
Step 2: Create a Contact via the Core API
Now that you have obtained an API token, you are ready to use the Core API. In this section, you will learn how to create a new contact in Front using the Create Contact endpoint.
In the real world, the contact details you create will likely come from a database external to Front from which you want to sync information. For this tutorial, you will create a contact based on the fictional TV show character, Dale Cooper. The contact will have:
- name
- description
- links to relevant URLs
- contact list for categorization
- email handle
- Make the following API request to create the contact:
POST https://api2.frontapp.com/contacts

Headers:
'Accept: application/json'
'Content-Type: application/json'
'Authorization: Bearer YOUR_API_TOKEN'

Request body:
{
    "name": "Dale Cooper",
    "description": "Dale Bartholomew Cooper is a special agent of the Federal Bureau of Investigation who in 1989 was assigned to investigate the brutal murder of the popular high school student, Laura Palmer in the town of Twin Peaks, Washington. He ended up falling in love with the town and gained a great deal of acceptance within the normally tight-knit community.",
    "links": [
        "https://twinpeaks.fandom.com/wiki/Dale_Cooper",
        "https://en.wikipedia.org/wiki/Dale_Cooper"
        ],
    "group_names": [
        "Twin Peaks Characters"
    ],
    "handles": [
        {
            "source": "email", "handle": "[email protected]"
        }
    ]
}
You should receive a successful response with status code 201 that looks like the following example:
{
    "_links": {
        "self": "https://cloud-content-consulting.api.frontapp.com/contacts/crd_1xamg5p",
        "related": {
            "notes": "https://cloud-content-consulting.api.frontapp.com/contacts/crd_1xamg5p/notes",
            "conversations": "https://cloud-content-consulting.api.frontapp.com/contacts/crd_1xamg5p/conversations",
            "owner": null
        }
    },
    "id": "crd_1xamg5p",
    "name": "Dale Cooper",
    "description": "Dale Bartholomew Cooper is a special agent of the Federal Bureau of Investigation who in 1989 was assigned to investigate the brutal murder of the popular high school student, Laura Palmer in the town of Twin Peaks, Washington. He ended up falling in love with the town and gained a great deal of acceptance within the normally tight-knit community.",
    "avatar_url": null,
    "links": [
        "https://twinpeaks.fandom.com/wiki/Dale_Cooper",
        "https://en.wikipedia.org/wiki/Dale_Cooper"
    ],
    "handles": [
        {
            "source": "email",
            "handle": "[email protected]"
        }
    ],
    "groups": [ "Twin Peaks Characters" ],
    "updated_at": 1644365795.363,
    "is_private": false,
    "account": null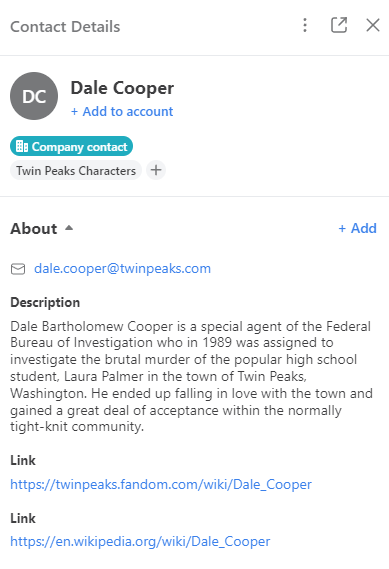
}- Note the id returned in the successful response. You will use this ID to make updates to the contact.
TipSome resources such as contacts allow you to use an alias to identify the resource instead of the ID. The alias pattern for contacts is alt:{source}:{handle}. In our example, the alias is
alt:email:[email protected]
- In Front, click the Contacts icon.
- Search for your newly created contact using a field such as email or name.
- Click the contact to view its details. You should see the information you submitted through the API:
Step 3: Update a contact
Our contact is off to a good start, but there are more fields you can utilize to round it out. In this section of the tutorial, you will make the following additions to the contact:
- Fill in custom fields (demonstrates configuring custom fields in Front before you can use them in the API)
- Add an avatar image (demonstrates a multipart request, which you will use anytime you send files to Front via the API)
- Add another handle
Let’s tackle these updates one at a time.
Fill in custom fields
To fill in custom fields for a contact, you must first configure custom fields in Front. Then, use the Update a Contact endpoint to set the value of the fields.
- Use the Custom Fields guide to create the following two custom fields in Front:
- Job Title
- Location
NoteCustom field names are case sensitive, so make sure the titles you create match what you send in the API in the next step.
- Once your custom fields are configured, make the following API request using the PATCH method, replacing contact_id in the URI with the ID you noted from the Create Contact response (or with an alias in the form of alt:{source}:{handle} such as
alt:email:[email protected]).
PATCH https://api2.frontapp.com/contacts/{contact_id}

Headers:
'Accept: application/json'
'Content-Type: application/json'
'Authorization: Bearer YOUR_API_TOKEN'

Request body:
{
    "custom_fields": {
        "Job Title": "FBI Special Agent",
        "Location": "Las Vegas, Nevada"
    }
}
You should receive a successful response with status code 204 that looks like the following example:
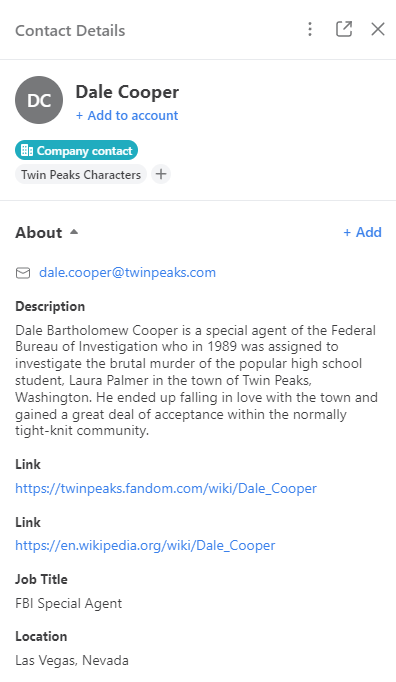
No content- In Front, click the Contacts icon.
- Search for your contact using a field such as email or name.
- Click the contact to view its details. You should see the custom fields you submitted through the API:
Add an avatar to a contact via a multipart request
To add a profile image to your contact, have an image ready and then use the Update a Contact endpoint to upload the file to Front.
- Make the following API request using the PATCH method, replacing contact_id in the URI with the ID you noted from the Create Contact response (or with an alias in the form of alt:{source}:{handle} such as
alt:email:[email protected]).
NoteWhen you upload a file for the avatar, you must set the Content-Type header to multipart/form-data instead of application/json. Split each contact field into multiple form fields (one for each property) named after the property key. You can read about multipart requests here and view sample code here.
PATCH https://api2.frontapp.com/contacts/{contact_id}

Headers:
'Accept: application/json'
'Content-Type: multipart/form-data'
'Authorization: Bearer YOUR_API_TOKEN'

Request body:
--form 'avatar=@PATH_TO_FILE'
You should receive a successful response with status code 204 that looks like the following example:
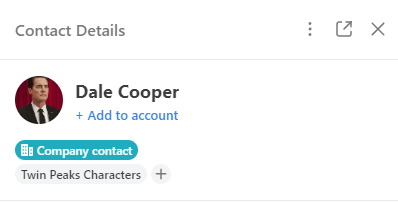
No content- In Front, click the Contacts icon.
- Search for your contact using a field such as email or name.
- Click the contact to view its details. You should see the profile picture you submitted through the API:
Add another handle
You can add multiple handles to a contact, including multiple handles of the same type such as two emails or two Twitter handles, for example, so long as the handles are unique.
NoteTo add handles to an existing contact, you must use the Add Contact Handle endpoint instead of the Update a Contact endpoint. If the handle you are adding is attached to another contact, you must remove it from the other contact before attaching it.
- Make the following API request using the POST method, replacing contact_id in the URI with the ID you noted from the Create Contact response (or with an alias in the form of alt:{source}:{handle} such as
alt:email:[email protected]).
POST https://api2.frontapp.com/contacts/{contact_id}/handles

Headers:
'Accept: application/json'
'Content-Type: application/json'
'Authorization: Bearer YOUR_API_TOKEN'

Request body:
{
    "handle": "[email protected]",
    "source": "email"
}
You should receive a successful response with status code 204 that looks like the following example:
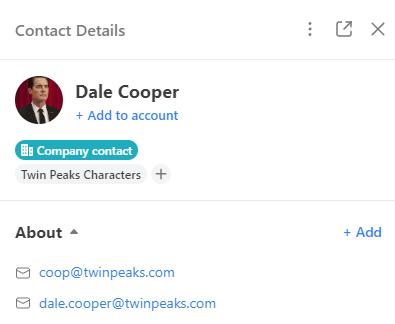
No content- In Front, click the Contacts icon.
- Search for your contact using a field such as email or name.
- Click the contact to view its details. You should see the new handle you added for the contact:
All done!
Congratulations! You’ve just used the Core API to enable useful functionality in Front.
The Core API provides a rich variety of endpoints. Now that you are familiar with the basics of using the Core API, we recommend you explore the full range of functionality you can access when building an integration:
Also, make sure to visit the Tools page and the Sample Application page for resources that make it easier to build integrations with the Core API
Happy coding!
Updated over 1 year ago