Getting Started with the Plugin SDK
Plugins expose a side drawer in Front that provides users with additional information and functionality related to a conversation. With plugins, you can visually augment Front with data from an external system and allow users to take actions that impact Front or the external system.
This tutorial demonstrates a simple use case for the Front Plugin SDK. In this tutorial, you will learn:
- How to create a sidebar plugin in Front
The concepts in this tutorial also apply to composer plugins
While this tutorial demonstrates creating a sidebar plugin, you can use the same philosophy when creating composer plugins. The chief difference will be in the exact Context available to the plugin, which differs between composer and sidebar plugins. The methods available may also differ, as some are available across all contexts while others are only available to select contexts (the reference topics for the methods denote availability).
Refer to the Overview topic to learn more about the differences between composer and sidebar plugins.
- How to connect an external host application to your Front plugin
- How to load the Plugin SDK into your external host application
- How to use the Context available from the Plugin SDK to expose information about a Front user within your plugin
- How to use external data to augment the information in Front
- How to use the Plugin SDK methods to create a pre-populated draft within Front when a user clicks a button in your plugin
- How to use the Front UI Kit to save time implementing common plugin components (limited to the React.js framework)
Prerequisites
- If you don’t already have access to a Front account, create a developer account.
Sample code
You can access the final plugin application code in the plugin-getting-started GitHub repository.
Step 1: Create a plugin in Front
Plugins load a host application from a URL and render the contents of the hosted application in Front. The first step is to create an app with a plugin feature in Front and configure it to point to the URL of the hosted application.
Admin privileges requiredYou must be an admin to create a plugin in Front. To receive admin permissions, create a developer account as described in the Prerequisites section.
-
In Front, click the Settings icon.
-
Select Company in the drop-down menu, and then click Developers.
-
Click Create app.
-
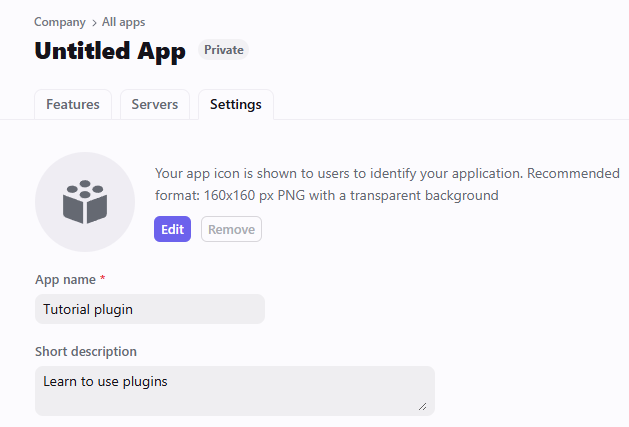
In the Settings tab, name and describe your plugin as you wish.
-
Under the Features tab of your newly created app, click Add feature.
-
Click Sidebar Plugin.
-
Configure the plugin settings:
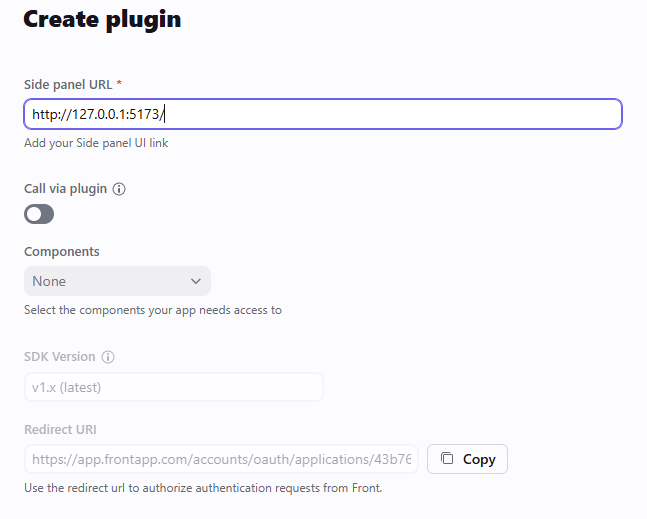
- Side panel URL—specify the URL where you will host your plugin application. While you are developing your plugin, you can set the URL to the localhost port where your development app will run (for example,
[http://localhost:3000](http://127.0.0.1:5173/)). When your plugin is complete and hosted on the web, you can update the endpoint value. - Call via plugin—leave this disabled for purposes of this tutorial.
- Components—select None for purposes of this tutorial.
- SDK version—defaults to the latest option.
- Click Create when you are done configuring your plugin.
- Side panel URL—specify the URL where you will host your plugin application. While you are developing your plugin, you can set the URL to the localhost port where your development app will run (for example,
Step 2: View your plugin in Front
After you create your plugin, you can view it in Front. This is how users will access your plugin, so it is important to regularly test your plugin in Front rather than solely on the hosted site to make sure it works as expected within the Front UI.
- In Front, return to your inbox.
- Hard refresh your browser to ensure you pick up the latest changes to the plugins.
- In the right-hand sidebar, click the Manage integrations icon, which is represented by a + symbol.
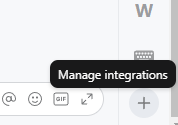
Manage integrations icon
- Search for your plugin by name.
- In the search results, ensure your plugin is pinned to your sidebar. Plugins are pinned when the pin icon displays as a blue color.
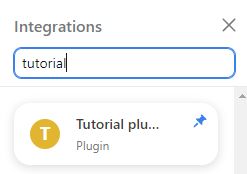
Plugin search box
- Close the integrations search bar and return to your inbox. You should now see your plugin in the integrations sidebar. When you hover over the icon, it displays the name you gave your plugin.
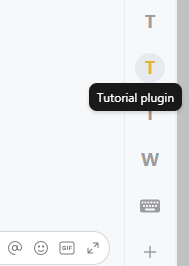
Your plugin pinned on the sidebar
- Click your plugin in the sidebar.
The plugin opens an empty drawer. Don’t worry—that’s expected at this point in the tutorial because you haven’t developed the host application yet. In the rest of this tutorial, you will learn how to add useful functionality to your plugin.
Step 3: Create an application to run your plugin code
Now that you’ve set up a Front plugin, you need to create an application that actually runs the code for the plugin. You can create this application in any programming language or web framework that supports loading a JavaScript SDK—so long as you host your application on the web, Front will be able to pull it into your plugin.
For purposes of this tutorial, we will use React.js to create our plugin application. For that reason, the code examples in this tutorial will use JavaScript and React paradigms. However, you can use any framework of your choice to accomplish the goals in this tutorial so long as you adapt the code accordingly.
- Install Node.js if you don’t already have it installed.
- Create a new React application using Vite. The following code block demonstrates what to type into your command line to create a new. Refer to the Vite documentation for the latest instructions.
npm create vite@latest- Follow the terminal prompts to create a project called "my-app", using the React framework, and JavaScript.
- After you create the application via the command line, change directories into the new folder.
cd my-app- Run the following commands in the my-app directory to test that everything works. You should see localhost port in the terminal (usually http://127.0.0.1:5173/), and you can open a browser window at that address to view the default Vite splash page.
npm install
npm run dev- After confirming that your React application is working, modify the App.jsx file in the src directory so that it matches the following code block:
import './App.css';

function App() {
  return (
    <div className="App">
      <p>Hello world!</p>
    </div>
  );
}

export default App;- If your development server is still running, you should see your browser window render “Hello world!” at http://127.0.0.1:5173/, or whatever port you’ve set your development server to.
- With the development server still running, return to Front.
- Open your plugin. You should see the contents of your application within the plugin drawer. Your plugin now renders “Hello world!” instead of an empty drawer.
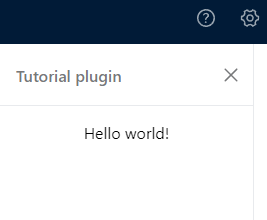
Step 4: Load the Front Plugin SDK
Now that you’ve connected your application to your Front plugin, it’s time to load the Front Plugin SDK. The Plugin SDK gives your application access to Front contexts, methods, and data models that you can leverage to build useful functionality. For example, the Plugin SDK gives you access to the conversations that the user is viewing in Front, and allows you to perform actions within Front such as adding a tag to a conversation or creating a new message draft.
In this section of the tutorial, you load the Front Plugin SDK and pass its context data throughout the React app. You then use the context data coming from Front to display information about the user interacting with the plugin.
- In your command line, run the following command in your application’s root directory to install the Front Plugin SDK.
npm install @frontapp/plugin-sdk- Create a new directory named providers within the src directory.
- Create a file named frontContext.jsx within the providers directory. Add the following code to the file to import the Plugin SDK and pass context data throughout your application.
Code highlightsLine 2 imports the Front Plugin SDK.
Line 26 subscribes to Front context updates. Read more about getting events from Front, changes in context, and what the Front context object is composed of.
The rest of the code passes Front context data through your application using the paradigms of React Context components.
import {createContext, useContext, useEffect, useState} from 'react';
import Front from '@frontapp/plugin-sdk';

/*
 * Context.
 */

export const FrontContext = createContext();

/*
 * Hook.
 */

export function useFrontContext() {
  return useContext(FrontContext);
}

/*
 * Component.
 */

export const FrontContextProvider = ({children}) => {
  const [context, setContext] = useState();

  useEffect(() => {
    const subscription = Front.contextUpdates.subscribe(frontContext => {
      setContext(frontContext);
    })
    return () => subscription.unsubscribe();
  }, [])

  return (
    <FrontContext.Provider value={context}>
      {children}
    </FrontContext.Provider>
  )
}- In the main.jsx file within the src directory, update your code so it matches the following code block. This code loads the Front context provider via an import on Line 5, and then passes the Front context as a Context component to your app in Lines 9 and 11.
import React from 'react';
import ReactDOM from 'react-dom';
import './index.css';
import App from './App';
import {FrontContextProvider} from './providers/frontContext';

ReactDOM.render(
  <React.StrictMode>
    <FrontContextProvider>
      <App />
    </FrontContextProvider>
  </React.StrictMode>,
  document.getElementById('root')
);-
In the App.jsx file, update your code so that you are receiving the Front context and handling it conditionally. The Front context can be loading, pertain to one conversation, pertain to multiple conversations, or pertain to no selected conversation, depending on what the user is doing in Front.
For example, if a user has one conversation selected in Front, the context rendered is singleConversation. If the user selects multiple conversations, the context rendered is multiConversations. Your application needs to handle all of the possible context types, which this tutorial handles with a switch statement.
For purposes of this tutorial, the plugin functionality only loads for the single-conversation context (by loading a custom Tutorial component), and displays instructional messages otherwise.
At this step, the Tutorial component is not definedYou create the Tutorial.jsx file in Step 7 of this section. Until then, the code will give you errors if you try to run it because the file has not been defined.
import './App.css';
import Tutorial from './components/Tutorial';
import { useFrontContext } from './providers/frontContext';


function App() {
  const context = useFrontContext();

  if (!context)
    return (
      <div className="App">
        <p>Waiting to connect to the Front context.</p>
      </div>
    )

  switch(context.type) {
    case 'noConversation':
      return (
        <div className="App">
          <p>No conversation selected. Select a conversation to use this plugin.</p>
        </div>
      );
    case 'singleConversation':
      return (
        <div className="App">
          <Tutorial />
        </div>
      );
    case 'multiConversations':
      return (
        <div className="App">
          <p>Multiple conversations selected. Select only one conversation to use this plugin.</p>
        </div>
      );
    default:
      console.error(`Unsupported context type: ${context.type}`);
      break;
  };
}

export default App;- Create a new directory named components within the src directory.
- Create a file named Tutorial.jsx within the components directory. Add the following code to the file, which greets the user based on the name they have set in Front.
import { useFrontContext } from '../providers/frontContext';

function Tutorial() {
  const context = useFrontContext();

  const user = (context.teammate && context.teammate.name) ? context.teammate.name : 'world';

  return (
    <div className="App">
      <p>Hello {user}!</p>
    </div>
  );
}

export default Tutorial;- Return to Front.
- Open your plugin and select a conversation in your inbox. You should see your name in the plugin, which is being extracted from the Front context. Nicely done!
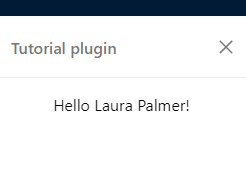
Step 5: Load external data
One of the useful features of building a Front plugin is the ability to visually expose data from external systems within the Front UI. In this section of the tutorial, you load mock data about the company you are messaging. This data is hard coded in this tutorial to keep things simple, but in a real-world use case you could adapt the code to fetch data from an API or external database based on a given identifier.
- In the Tutorial.jsx file, update your code as shown in the following code block. This code uses a React hook to fetch mock data and then displays it in your plugin. As mentioned, this data could come from an API or external database, but for purposes of this tutorial is hard coded.
import React, {useEffect, useState} from 'react';
import { useFrontContext } from '../providers/frontContext';

function Tutorial() {
  const context = useFrontContext();
  const [companyStats, setCompanyStats] = useState({});

  const user = (context.teammate && context.teammate.name) ? context.teammate.name : 'world';

  useEffect(() => {
    // Pseudo-code for fetching data from an external API or database
    setCompanyStats(
      {
        'company': 'Blue Rose Labs',
        'accountNumber': 54968483,
        'activeOrder': 8347
      }
    );
  }, []);

  return (
    <div className="App">
      <p>Hello {user}!</p>
      <h4>Contact details:</h4>
      <table>
        <tbody>
          <tr>
            <td><b>Company</b></td>
            <td>{companyStats.company}</td>
          </tr>
          <tr>
            <td><b>Account number</b></td>
            <td>{companyStats.accountNumber}</td>
          </tr>
          <tr>
            <td><b>Active order</b></td>
            <td><a href="https://example.com">{companyStats.activeOrder}</a></td>
          </tr>
        </tbody>
      </table>
    </div>
  );
}

export default Tutorial;- Return to Front and make sure your development server is running (npm run dev).
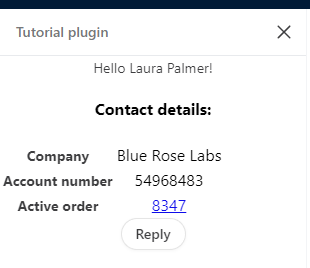
- Open your plugin and select a conversation in your inbox. You should see the mock contact details displayed in addition to your name.
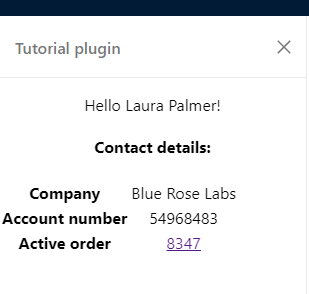
Step 6: Use the SDK methods
Thus far, you’ve loaded the Plugin SDK and used it to extract the context of the Front conversation. This allowed you to address the Front user by the name they have set in Front, information your application otherwise did not have access to. You've also used mock data from an external system to augment the information in Front.
Next, you will use the createDraft and listMessages methods to draft a new message from your plugin, providing your application with native Front functionality so you can improve the daily workflow of Front users.
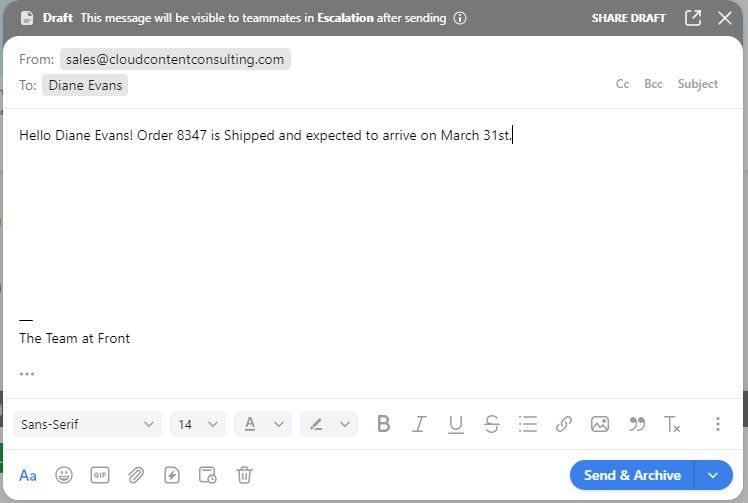
- In the Tutorial.jsx file, update your code so it matches the following code block. The code adds a Reply button to your plugin. When the user clicks the button, a draft reply is automatically created to the latest message in the conversation, prefilled with the recipient name, order status, and delivery date.
Conversations can have multiple messagesA conversation in Front can have multiple messages. Therefore, to reply to the latest message in a conversation, you must first identify the ID of the latest message, as shown in the React hook starting on Line 13. The listMessages method returns an array of Messages.
import React, {useEffect, useState} from 'react';
import { useFrontContext } from '../providers/frontContext';

function Tutorial() {
  const context = useFrontContext();
  const [companyStats, setCompanyStats] = useState({});
  const [latestMessageId, setLatestMessageId] = useState();

  const user = (context.teammate && context.teammate.name) ? context.teammate.name : 'world';
  const recipient = (context.conversation && context.conversation.recipient && context.conversation.recipient.name) ? context.conversation.recipient.name : 'there';

  // Watches the context and selected the latest message id from the available messages.
  useEffect(() => {
    context.listMessages()
      .then(response => {
        if (response.results.length > 0) {
          const latestMessageIndex = response.results.length - 1;
          setLatestMessageId(response.results[latestMessageIndex].id)
        } else {
          setLatestMessageId(undefined);
        }
      });
  }, [context]);

  useEffect(() => {
    // Pseudo-code for fetching data from an external API or database
    setCompanyStats(
      {
        'company': 'Blue Rose Labs',
        'accountNumber': 54968483,
        'activeOrder': 8347,
        'status': 'Shipped',
        'deliveryDate': 'March 31st'
      }
    );
  }, []);

  const onCreateDraftClick = () => {
    if (!latestMessageId)
      return;

    context.createDraft({
      content: {
        body: `Hello ${recipient}! Order ${companyStats.activeOrder} is ${companyStats.status} and expected to arrive on ${companyStats.deliveryDate}.`,
        type: 'text'
      },
      replyOptions: {
        type: 'replyAll',
        originalMessageId: latestMessageId
      }
    })
  };

  return (
    <div className="App">
      <p>Hello {user}!</p>
      <h4>Contact details:</h4>
      <table>
        <tbody>
          <tr>
            <td><b>Company</b></td>
            <td>{companyStats.company}</td>
          </tr>
          <tr>
            <td><b>Account number</b></td>
            <td>{companyStats.accountNumber}</td>
          </tr>
          <tr>
            <td><b>Active order</b></td>
            <td><a href="https://example.com">{companyStats.activeOrder}</a></td>
          </tr>
        </tbody>
      </table>
      {latestMessageId && <button onClick={onCreateDraftClick}>Reply</button>}
    </div>
  );
}

export default Tutorial;- Return to Front.
- Open your plugin and select a message in your inbox. You should now see the Reply button in the plugin drawer. When you click the button, a draft composer window opens. The recipient is already filled in and the body starts off with a personal greeting to the recipient that includes information about their order. In this tutorial, the order information is hard-coded, but you can adapt the tutorial to pull in information from an external system. You can start to see how you can begin to customize Front workflows using plugins!
Step 7: Use the Front UI Kit component library
The Front UI Kit provides a library of React components for you to use when building plugins. Front recommends using the Front UI Kit components whenever possible in order to save development time and achieve a more uniform look and feel across plugins.
In this section, you install and import the Front UI Kit into the tutorial plugin.
- In a terminal window open to your project's root directory, run
npm install @frontapp/ui-kitto install the Front UI Kit. Alternatively, you can runyarn add @frontapp/ui-kitto use Yarn instead of npm. - In Tutorial.jsx, add an import statement to import the
<Paragraph>,<Heading>, and<Button>components.
...
import {Paragraph, Heading, Button} from '@frontapp/ui-kit';
...- Modify the code in Tutorial.jsx to utilize the elements you imported, as show in the following code block.
import React, {useEffect, useState} from 'react';
import { useFrontContext } from '../providers/frontContext';
import {Paragraph, Heading, Button} from '@frontapp/ui-kit';


function Tutorial() {
  const context = useFrontContext();
  const [companyStats, setCompanyStats] = useState({});
  const [latestMessageId, setLatestMessageId] = useState();

  const user = (context.teammate && context.teammate.name) ? context.teammate.name : 'world';
  const recipient = (context.conversation && context.conversation.recipient && context.conversation.recipient.name) ? context.conversation.recipient.name : 'there';

  // Watches the context and selected the latest message id from the available messages.
  useEffect(() => {
    context.listMessages()
      .then(response => {
        if (response.results.length > 0) {
          const latestMessageIndex = response.results.length - 1;
          setLatestMessageId(response.results[latestMessageIndex].id)
        } else {
          setLatestMessageId(undefined);
        }
      });
  }, [context]);

  useEffect(() => {
    // Pseudo-code for fetching data from an external API or database
    setCompanyStats(
      {
        'company': 'Blue Rose Labs',
        'accountNumber': 54968483,
        'activeOrder': 8347,
        'status': 'Shipped',
        'deliveryDate': 'March 31st'
      }
    );
  }, []);

  const onCreateDraftClick = () => {
    if (!latestMessageId)
      return;

    context.createDraft({
      content: {
        body: `Hello ${recipient}! Order ${companyStats.activeOrder} is ${companyStats.status} and expected to arrive on ${companyStats.deliveryDate}.`,
        type: 'text'
      },
      replyOptions: {
        type: 'replyAll',
        originalMessageId: latestMessageId
      }
    })
  };

  return (
    <div className="App">
      <Paragraph>Hello {user}!</Paragraph>
      <h4>Contact details:</h4>
      <table>
        <tbody>
          <tr>
            <td><Heading>Company</Heading></td>
            <td>{companyStats.company}</td>
          </tr>
          <tr>
            <td><Heading>Account number</Heading></td>
            <td>{companyStats.accountNumber}</td>
          </tr>
          <tr>
            <td><Heading>Active order</Heading></td>
            <td><a href="https://example.com">{companyStats.activeOrder}</a></td>
          </tr>
        </tbody>
      </table>
      {latestMessageId && <Button onClick={onCreateDraftClick}>Reply</Button>}
    </div>
  );
}

export default Tutorial;
After importing and using the Front UI Kit, the plugin renders as follows:
To learn about the components available in the Front UI Kit, refer to the following resources:
- Front UI Kit topic
- Storybook on GitHub
All done!
Congratulations! You’ve just used the Plugin SDK to enable useful functionality in Front. This tutorial kept things simple, but you can expand upon the lessons you learned to build truly robust plugins that pull data in from outside sources and merge the additional information with actions that a Front user can take within your plugin. Check out our Sample Applications page for sample code that is a bit more elaborate.
Now that you are familiar with the basics of using the Plugin SDK, we recommend you explore the full range of functionality you can access when building a plugin by exploring the following reference topics:
When you are finished creating your plugin, you can submit it to us for publication. To learn about the process, refer to the Partnering With Front topic. If you want to use your plugin only at your company, there is no need to publish. So long as dev mode is not enabled, anyone using your Front instance will have access to your plugin.
Happy coding!
Updated 8 months ago
