
Creating new API records using Connectors and App Triggers
Overview
When creating new API records such as a new order or shipment directly from Front app requests, API response timeouts can prevent critical data from flowing back to Front—even when the record is successfully created in the external system (generally, if a process takes longer than 5 or 10 seconds to complete, Front will consider it a timeout).
This workflow solves that problem by sending information about the new record to Front after it has fully completed the creation process, ensuring your Front automations to execute reliably regardless of external processing time. The key Front features that enable this are:
- App requests (Connectors)
- App objects (Connectors)
- Application Triggers
- Rules and macros (workflows)
The Example Scenario
For this example, we are going to assume that we are a logistics company that uses the Tai Transportation Management System to manage our loads and shipments.
Running a macro in Front to create a Tai shipment works as intended—the shipment is created successfully by an app request. However, Tai's powerful automations mean that creating a shipment and returning a response to Front can take longer than Front's API timeout threshold. Because of this:
- The shipment is created in Tai
- BUT Front never receives the shipment ID
- Downstream automations in Front which key off the shipment ID (like attaching shipment-related app objects and rules that run off the app object fields) fail to execute
- Your team loses the automation benefits you've built
The Solution
This workflow uses a "callback pattern" that marks the conversation for later updates, passes the conversation reference to Tai during shipment creation, and uses webhooks and app triggers to return the shipment ID to Front once Tai completes its processing. The result: bulletproof automation regardless of processing time.
How It Works
Step 1: Mark the Conversation
When a teammate runs the Tai shipment macro, Front immediately attaches an app object to the conversation containing the conversation URL. This serves as a marker that says "this conversation is waiting for a Tai shipment ID."
Step 2: Pass the Conversation Reference to Tai
The macro sends the Front conversation ID to Tai as the "API Quote Number" field when creating the shipment. This creates a link between the Tai shipment and the Front conversation. Basically, we're passing the conversation ID to the external system so that it sends it back in the webhook after the resource is created. If you're connecting with a different system than Tai, the idea is to use one of the fields (ideally a custom field) to pass the Front conversation ID to the external system.
Step 3: Tai Creates the Shipment
Tai runs all its internal automations and creates the shipment, taking as long as needed without worrying about Front's timeout.
Step 4: Webhook Notification
Once the shipment is complete, Tai sends a webhook event containing the shipment details, including the newly generated shipment ID and the API Quote Number (which contains the Front conversation ID).
Step 5: Zapier Bridge
A Zap catches the Tai webhook, extracts both the Front conversation ID and the Tai shipment ID from the event data, then makes a POST request to Front's app trigger endpoint to notify of the new shipment. You could also complete this step with your own server logic, but using an automation tool like Zapier will be easier for most people.
Step 6: Front Receives the Shipment ID
Front receives the app trigger event, which activates a rule that targets conversations with the matching conversation URL in their app object (the marker we added in Step 1).
Step 7: Downstream Automation
The rule posts a comment containing the shipment ID, which triggers your existing downstream automations—attaching shipment-related app objects, auto-archiving conversations below certain shipment thresholds, notifying stakeholders, etc.
The Result
Your team gets reliable shipment creation automation with full context in Front, regardless of how long Tai's (or any other external system) processing takes. No manual follow-up, no lost shipment IDs, no broken automation chains.
Implementation Guide
Prerequisites
- Front account with Connectors enabled
- Tai TMS account with webhook capabilities (this can be adapted to other services, we are just using Tai as our example)
- Zapier account with access to webhooks (or similar webhook processing tool or server code)
Part 1: Creating the Marker App Object in Front
In this step, you create an app object that marks the conversation that is waiting on the shipment ID from Tai. You can use any unique value that will uniquely identify the appropriate conversation. Because Front provides a conversation ID, this is one of the easiest values to use.
-
In Front, go to Settings > Company > Developers.
-
Create a new app or use an existing one.
-
Create a new feature and select App Object. Name it "Add conversation ID" or similar.
-
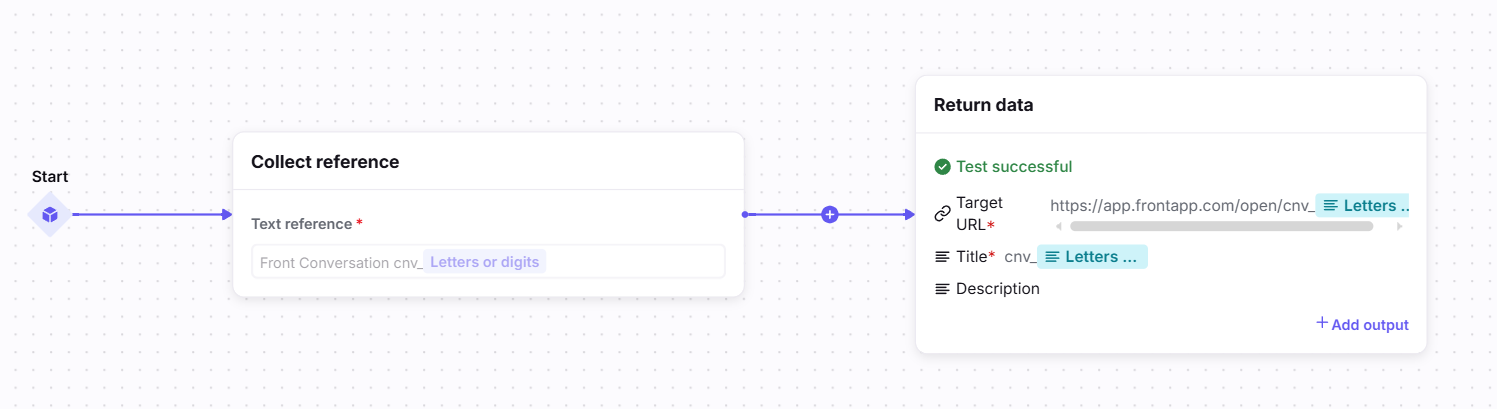
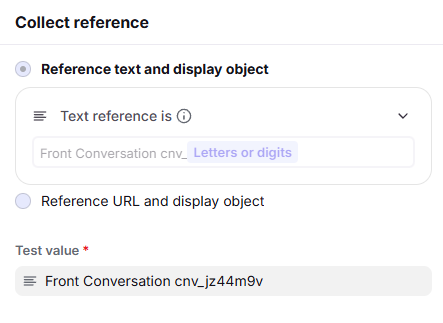
For the Collect reference node, select Reference text and display object where the text reference is Front Conversation cnv_ immediately followed by a Letters or digits variable. While you can modify this reference, the basic idea is that you are matching on a conversation ID.
Note that there is an underscore ( _ ) after cnv
-
Supply a test value. For example, a value of "Front Conversation cnv_jz44m9v" will return "jz44m9v" as the Letters or digits variable. The "Front Conversation" portion can be any phrase you want to use to make it less likely that the app object will be triggered by a false positive.
-
After setting up the reference node, click the Send request node and delete it using the trash icon. We do not need to make an external API call to create this app object.
-
Click the Return data node.
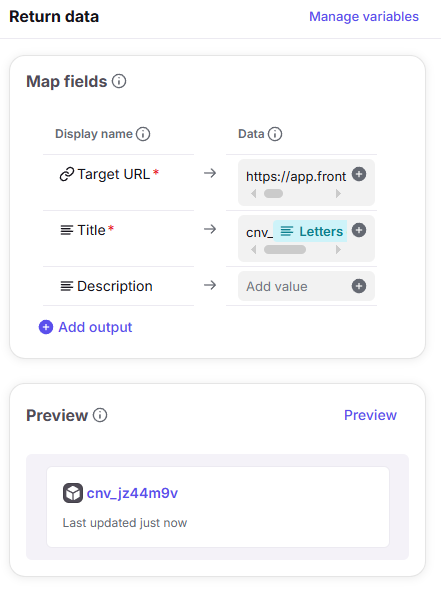
- For the Target URL, input https://app.frontapp.com/open/cnv_ immediately followed by the Letters or digits variable.
Note that there is an underscore ( _ ) after cnv
- For the Title, input cnv_ immediately followed by the Letters or digits variable.
Note that there is an underscore ( _ ) after cnv
- For the Target URL, input https://app.frontapp.com/open/cnv_ immediately followed by the Letters or digits variable.
-
Click Preview to test that everything is working and then Save your app object.
Part 2: Building the Tai Shipment Macro
In this step, you create a macro that initiates creating a shipment in Tai. The macro is powered by an app request that makes an API call to Tai. Front teammates run this macro manually whenever they want to start a new shipment from a conversation in Front.
-
In Front, go back to the Developers settings and find the app where you created the app object.
-
Create a new feature and select App Request. Name it "Build Tai Shipment" or similar.
-
Configure the app request to make the API call to build a shipment in Tai. Consult Tai's API documentation for details.
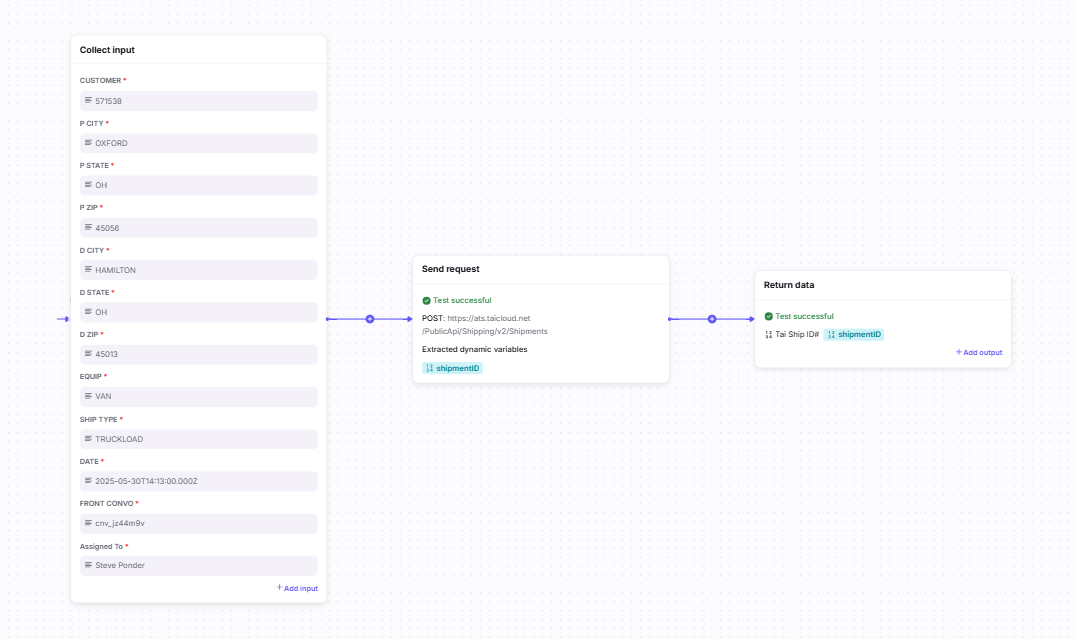
Make sure the app request has:
- An input field for the Front conversation ID (in our example below, we call it "Front Convo". This input can be mapped to a request body field in the Send request node. In our case, we map it to the API Quote Number field, but you can use any custom field or "unused" field of your choice.
- Any required fields for making the API call successfully, which will depend on how you use Tai's API to create a shipment for your business.
-
Save your app request.
While we're in the Front developer app, let's go ahead and create the application trigger that we will need later in the process.
-
In the same developer app where you created the app object and app request, create a new feature and select App Trigger.
-
Note the Trigger URL. You will input this into the Zapier step as the URL for the Send Front API custom request step.
-
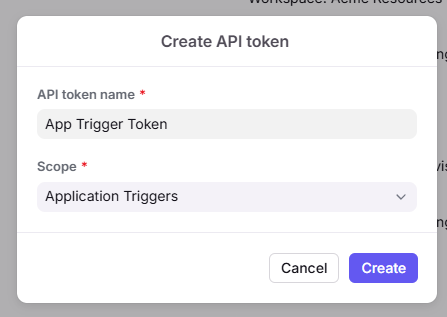
Use Postman or a similar tool to send a test POST request to Front. The request should look like the following snippet. For now, we are using dummy values and including the
dryRunquery parameter.You'll need to create an API token with the Application Triggers scope for this API call.
curl \
  --location 'https://api2.frontapp.com/applications/YOUR_APP_UID/events?dryRun=true' \
  --header 'Content-Type: application/json' \
  --header 'Authorization: Bearer <your api token>' \
  --data '{
      "event_type": "tai_shipment_update",
       "app_object": {
    			"ext_link": "https://app.frontapp.com/open/cnv_132345kd"
  		},
      "shipmentID": "12343545"
}'-
After you send your test payload, you should see it in the Event payload window.
-
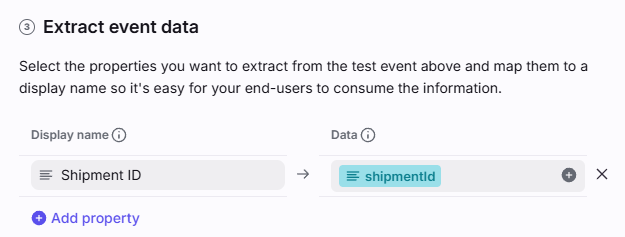
Select the shipmentID from the Event payload window and save it as a dynamic variable.
-
In the Extract event data section, add a string property and set it to your shipmentID dynamic variable. This variable will now be automatically available to any rules that use your application trigger.
Now that you've set up the app request and the app trigger, let's create the macro. This macro will send the app request to Tai, initiating the shipment build process.
-
Go to the settings for the workspace you want the macro to be available in.
-
Go to Rules and macros.
-
Click the Macros tab, and then Create macro.
-
Choose to create a macro from scratch.
-
In the Settings tab, give the macro a name, description, and select which inboxes it should apply to.
-
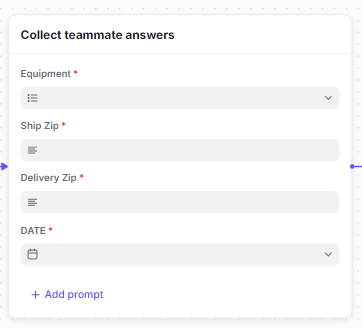
In the Flow builder tab, add a Collect teammate answers node so that the macro has that Front teammates can input shipment details, such as zip cods and equipment type.
-
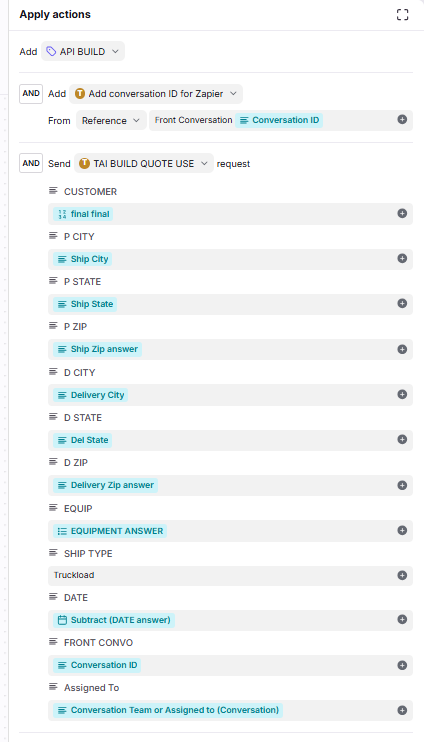
In the Flow builder tab, add actions to the macro so that it runs the app request you created earlier in this tutorial and also adds the app object to mark the conversation.
Make sure the macro:
- Maps necessary fields to the inputs of the app request. For example, create a new dynamic variable in the macro that represents the conversation ID. Then map this variable to the app request input for the Front conversation.
- You will also need to map teammate input capture answers to the correct fields in the app request. The exact mapping will depend on how you set up your app request.
- Ensure the macro adds the app object you created earlier in the conversation (in our screenshot, represented as "Add conversation ID for Zapier"). Make sure to create a dynamic variable that represents the conversation ID, and then pass it to your app object using the matching reference pattern (earlier, we defined this as "Front Conversation cnv_ID").
-
Click Create to save your macro.
Part 3: Configuring the Tai Webhook
In this step, you configure Tai to send event information anytime a new shipment is created.
Follow the instructions on Tai's website to learn how to configure webhooks in their system. The important notes include:
- Obtain the webhook URL from Zapier (details are in the next step of this tutorial, "Building the Zapier Bridge").
- Leave the username and password blank.
- Configure the webhook to send whenever a new shipment is created.
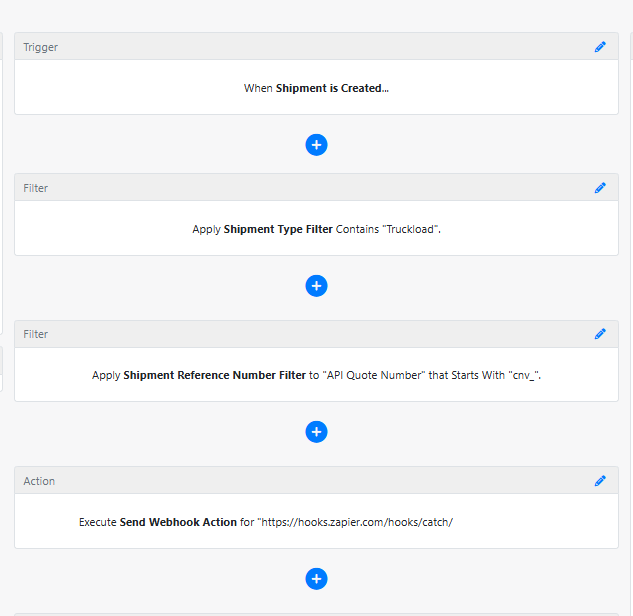
- Filter which shipments the webhook applies to. We want to limit the webhook events to shipments that were created by this macro. In our case, we know that the only relevant shipments are the ones that include a Front conversation ID as the API Quote Number. As such, you can filter for this in your webhook to only send event data when a teammate has manually created a Tai shipment through the Front macro. In the following screenshot, the filter is Apply Shipment Reference Number Filter to "API Quote Number" that Start With "cnv_".
Part 4: Building the Zapier Bridge
In this step, you set up Zapier to receive webhook data from Tai, process it, and then send an app trigger with the relevant information to Front.
You will need a Zapier account with access to webhooks.
-
In Zapier, create a new Zap.
-
Within the new Zap, locate the Copilot.

-
Paste the following prompt into the Copilot:
Create a Zap to integrate Tai shipment updates with Front app triggers ====================================================================== Please create a Zap with the following configuration: Step 1: Webhook Trigger ----------------------- - Use "Webhooks by Zapier" - Action: "Catch Raw Hook" - This will receive shipment data from Tai Step 2: Code by Zapier ---------------------- - Extract specific data from the webhook - Use this exact code: ```javascript // Extract API Quote Number from webhook data let webhookData; try { webhookData = JSON.parse(inputData.rawBody); } catch (e) { // If it's not JSON, treat as string webhookData = inputData.rawBody; } // Extract the specific "API Quote Number" property const apiQuoteNumber = webhookData.shipmentReferenceNumbers .find(ref => ref.referenceType === "API Quote Number")?.value || null; const shipmentId = webhookData.shipmentId; return { conversationId: apiQuoteNumber, shipmentId: shipmentId }; ``` - Map the "Raw webhook body data" from Step 1 to the input field Step 3: Custom Webhook Request to Front API ------------------------------------------- - Use "Webhooks by Zapier" - Action: "Custom Request" - Method: POST - URL: `https://api2.frontapp.com/applications/[YOUR_APP_UID]/events` - Headers: - Content-Type: `application/json` - Authorization: `Bearer [YOUR_API_TOKEN]` - Data (JSON): `json { "event_type": "tai_shipment_update", "app_object": { "ext_link": "https://app.frontapp.com/open/{{STEP_2_conversationId}}" }, "shipmentId": "{{STEP_2_shipmentId}}" }` - Set "Unflatten" to Yes - Set "Return Raw Response" to Yes - Set "Pass-through" to False Step 4: Add Conditional Paths for Success/Retry Logic ----------------------------------------------------- - Add Paths after Step 3 with two branches: ### Path A - Success Path: - Add a Filter step titled "Success Path" - Configure to continue only when the webhook request was successful (HTTP status 200-299) - The status code should come from the raw webhook response in Step 3 - **Add a Storage by Zapier step** after the filter: - Action: "Set Value" - Title: "Log successful Front API request" - Key: `front_api_success` - Value: Front API request succeeded for shipment {{STEP_2_shipmentId}} with conversation {{STEP_2_conversationId}} at {{STEP_3_Headers_Date}} ### Path B - Error & Retry Path: - Add a Filter step titled "Error & Retry Path" - Configure to continue only when the webhook request failed (HTTP status 400+ or connection error) - The status code should come from the raw webhook response in Step 3 - Add a Delay step to wait **1 minute** before retrying - Add another "Custom Request" step identical to Step 3 for the retry attempt ## Important notes: - Make sure to catch the full raw webhook in the first step. We want to have the full JSON available for code processing in the next step. - Make sure the two API requests to Front are custom requests and not normal POST requests. We want full control over the request body and headers so we can specify these precisely per the instructions. After setup: ------------ 1. Replace `[YOUR_APP_UID]` in the URL with your Front application UID 2. Replace `[YOUR_API_TOKEN]` in the Authorization header with your Front API bearer token 3. Configure the filter conditions based on the webhook response status 4. Use this webhook URL in your Tai configuration: `[WEBHOOK_URL_FROM_STEP_1]` Please create this Zap now and let me know when you need the specific values updated. -
If the prompt worked correctly, it should have created:
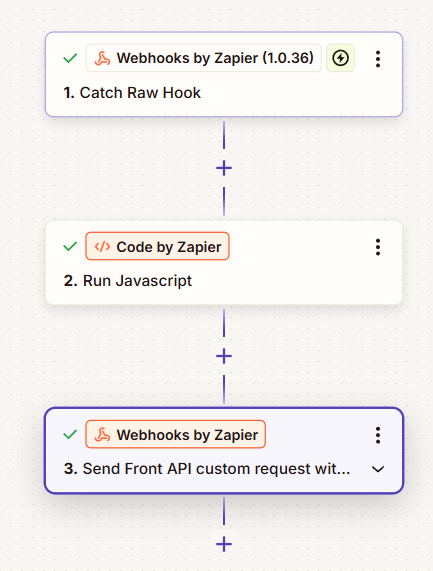
-
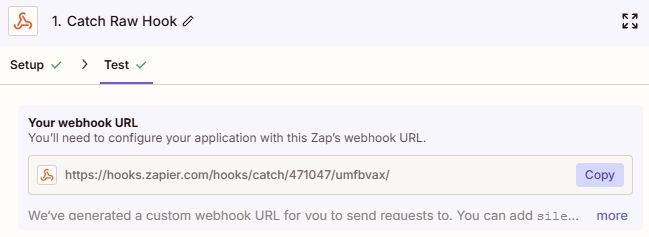
A Catch Raw Hook step.
This step catches the webhook event data from Tai. You should go into this step to note the webhook URL (usually shown in the Test tab).
-
A Code by Zapier step.
This step processes the event data from Tai and extracts the Front conversation ID and the Tai shipment ID. If you wanted to extract other fields from the Tai event, you could modify the code in this step to do so. You can see the code in the Configure tab, which should match what was requested in the Copilot prompt. -
A Webhooks by Zapier step that makes a custom request to the Front API for app triggers.
This step sends the needed information to Front via the application trigger endpoint. You will have to go into this step to complete the missing fields. -
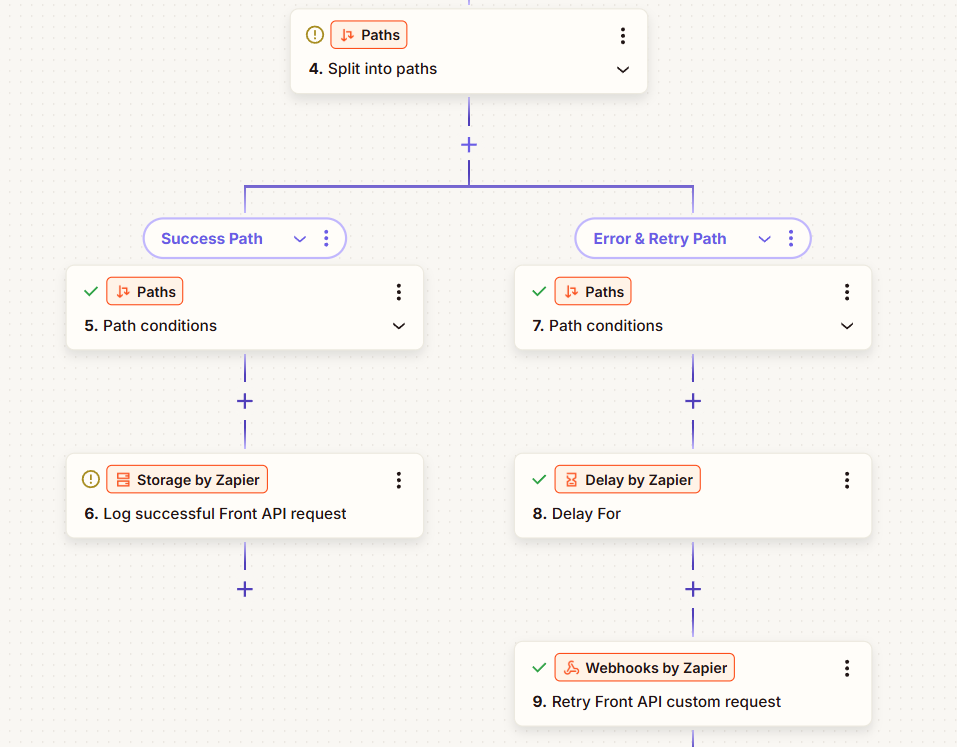
A branching success and retry path. This path handles situations when the Front application trigger endpoint returns an error to Zapier, most likely because the app object identified in the
ext_linkof the request hasn't completed indexing in Front. By adding in a reasonable delay and trying again, the workflow should succeed.-
The success path occurs when Front responds with a successful status code (any code in the 200 range).
-
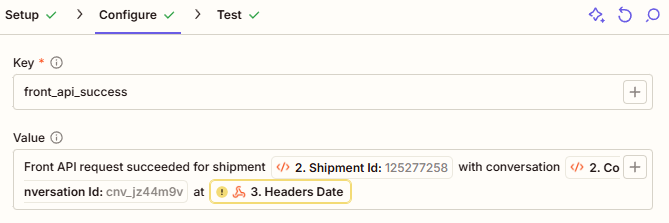
The success path ends with a Storage by Zapier step because Zapier requires that each path have an action after it. This step simply logs a successful result in Zapier. You might be asked to log into your Storage account. You may also have to fill out the Configure step, in which you can create any key you want and the value can be whatever you want to log. For example:
-
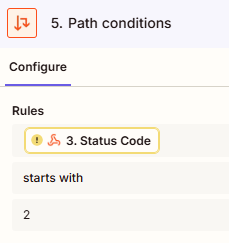
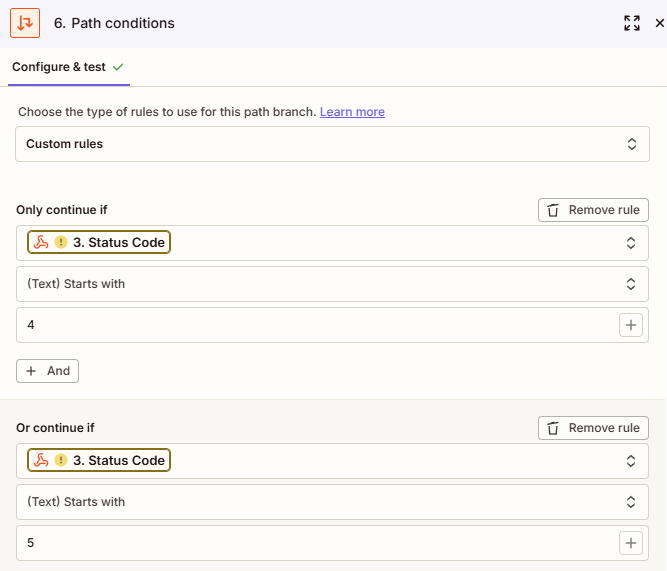
The retry path occurs when Front responds with a status code in the 400 or 500 range. In the error path case, Zapier waits 1 minute and then retries the API request to Front. The following screenshot shows the Path conditions for the error path.
- The retry path ends with another Webhooks by Zapier step that makes a custom request to the Front API for app triggers. This step should be configured identically to the one earlier in the process.
-
-
-
If you haven't done so already, go into the Catch Raw Hook step and note the webhook URL (usually found in the Test step). Go back to Tai and input this URL in the Tai webhook configuration so that Tai has the correct URL to send event data to.
-
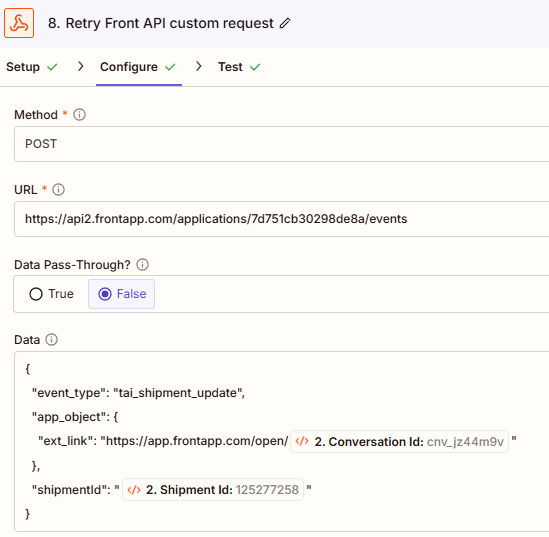
Go into the two Send Front API custom request steps and find the Configure tab. Update the following:
-
The URL should contain your App UID from Front. This should be the Trigger URL you noted when you created the app trigger in Front earlier in this tutorial.
https://api2.frontapp.com/applications/YOUR_APP_UID/events -
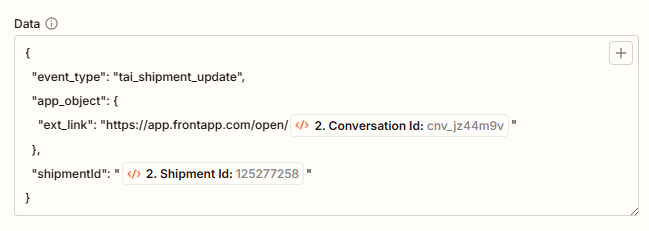
The Data section should look like the following screenshot. This is what the Front application trigger expects to receive. You shouldn't have to make changes unless the Copilot prompt made mistakes or if you're adding more fields to send to Front.
-
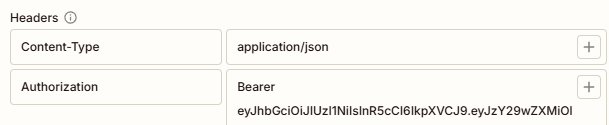
In the Headers section, add your Front API token (with application triggers scope) to the Authorization header. The token should be added after the word "Bearer", such as "Bearer YOUR_TOKEN".
-
-
After setting everything up, go into Front and use the macro you created to build a new shipment. Remember that this macro will be found as an option on messages that live within the workspaces and inboxes you applied the macro to.
After executing the macro, go to Zapier and test each step one by one. The Zap should pick up the event information of the Tai shipment and use that data to test each step in the Zap.
Common gotchas when setting up this Zap include:
-
Zapier not catching the full raw JSON event data in Step 1. Make sure this step is set to catch a raw webhook.
-
The Front API request steps not being set up as custom requests. If these are set up as normal POST requests, you will not have sufficient control of the request body and headers to successfully make the API call to Front's app trigger endpoint. The requests should look like the following screenshot, where you have full control of the request data versus a table or field-based input menu.
-
Part 5: Creating the App Trigger Rule in Front
In this final set, you set up a rule in Front that listens for the app trigger request and then updates the relevant conversations with the Tai shipment ID.
- Go to the settings for the workspace you want the rule to apply to in Front.
- Go to Rules and macros.
- Click Create rule.
- Create a rule from scratch. We recommend creating a branching rule if you have access to them, but linear rules will also work.
- Give the rule a name and select which inboxes it should apply to.
- In the Triggers section, delete the Inbound message is received. This is important because you only want the rule to run when the application trigger is received.
- In the Triggers section, add an App event is received trigger. Select the app trigger you created to receive shipment information from Tai.
- In the actions section, select to Add comment.
Note that this action should be modified depending on how you trigger downstream automations such as app objects and subsequent rules. In our example, we trigger these based on a comment that contains a Tai shipment ID. If you trigger your automations differently, modify this rule action to supply the Tai shipment ID according to how you've set up your workflow.
- Within the comment, click the plus (+) sign and select the Shipment ID dynamic variable.
- Click Create to save the rule.

You now have a rule that will run anytime the app trigger is received:
-
It will receive the conversation link from the app trigger payload (the
ext_linkpart of the request data) -
Identify the matching conversation in Front, which is the conversation that has an app object with a URL that matches the conversation link from the app trigger (this is the marker app object we created in the first step)
-
It will post the shipment ID from Tai into the conversation as a comment
-
Downstream automations that key off this shipment ID can now run!
This examples assumes that your downstream automations key off comments that contain a shipment ID. For example, an app object that identifies Tai shipment IDs in comments and attaches app objects to the conversation related to the Tai shipment.
If you want to key downstream automations off a different pattern (a different comment or a tag, etc.), make sure to update the app trigger rule in this section so that its action reflects how your pattern.
Conclusion
This callback pattern transforms API timeout limitations from a breaking point into a non-issue. By decoupling the initial request from the data retrieval, you gain the flexibility to integrate with external systems regardless of their processing complexity—whether that's 5 seconds or 5 minutes. The investment in setting up this workflow pays dividends through reliable automations, reduced manual follow-up, and the confidence that your team's context in Front stays complete even when external systems need time to process. Once you've implemented this pattern for one integration, you'll find opportunities to apply it across your entire automation ecosystem wherever processing times are unpredictable.
Updated 9 months ago