
AI agents
New release!Your feedback in our community group is invaluable for shaping the direction of AI agents in Front!
Overview
This guide walks you through connecting your own AI agent to Front as a first-class AI agent — a named entity that works alongside your human support team in the same inbox. Unlike a generic webhook integration, an AI agent participates in Front's full conversation lifecycle: it can be assigned conversations by rules or manually, take actions attributed to its own identity in the conversation timeline, and operate under the same permissions and oversight that apply to human teammates. Your agent keeps its own model, logic, and infrastructure; Front provides the interface, the assignment rules, and the governance layer.
The distinction matters for teams that need more than automation. A raw webhook can send API calls on your behalf, but it has no identity in Front and no place in your assignment or approval workflows. An AI agent, by contrast, shows up in assignment dropdowns, can be routed to by rules, unassigns itself when it can't proceed, and has every action it takes logged against its own identity — so it fits into the same oversight model as a human teammate. Your admin controls exactly what the agent is allowed to do through scoped permissions, and can adjust those at any time.
Prerequisites
This guide assumes you have already created an AI agent outside of Front, using tools like Claude, ChatGPT, n8n, industry-specific AI solutions, or any custom-built solution. The agent is hosted external to Front and has the skills necessary to evaluate customer conversations, access the sources of information it needs to make decisions, and draft replies.
To connect that agent to Front, it also needs a publicly reachable HTTPS webhook endpoint. Front sends a signed event to this endpoint whenever the agent is assigned a conversation or @mentioned in a comment. Your agent verifies the signature to confirm the request came from Front, then uses the event payload to know which conversation to act on.
The agent then makes outbound calls to Front's MCP server to pull conversation context, draft or send replies, apply tags, and take other actions. Authentication uses a client ID and client secret issued when you set the agent up as an AI teammate in Front, which the agent exchanges for a short-lived token to authorize each MCP call.
Once these pieces are in place, you can register the agent as an AI teammate in Front and start testing end to end.
What You'll Build
Your side of the integration has two main components:
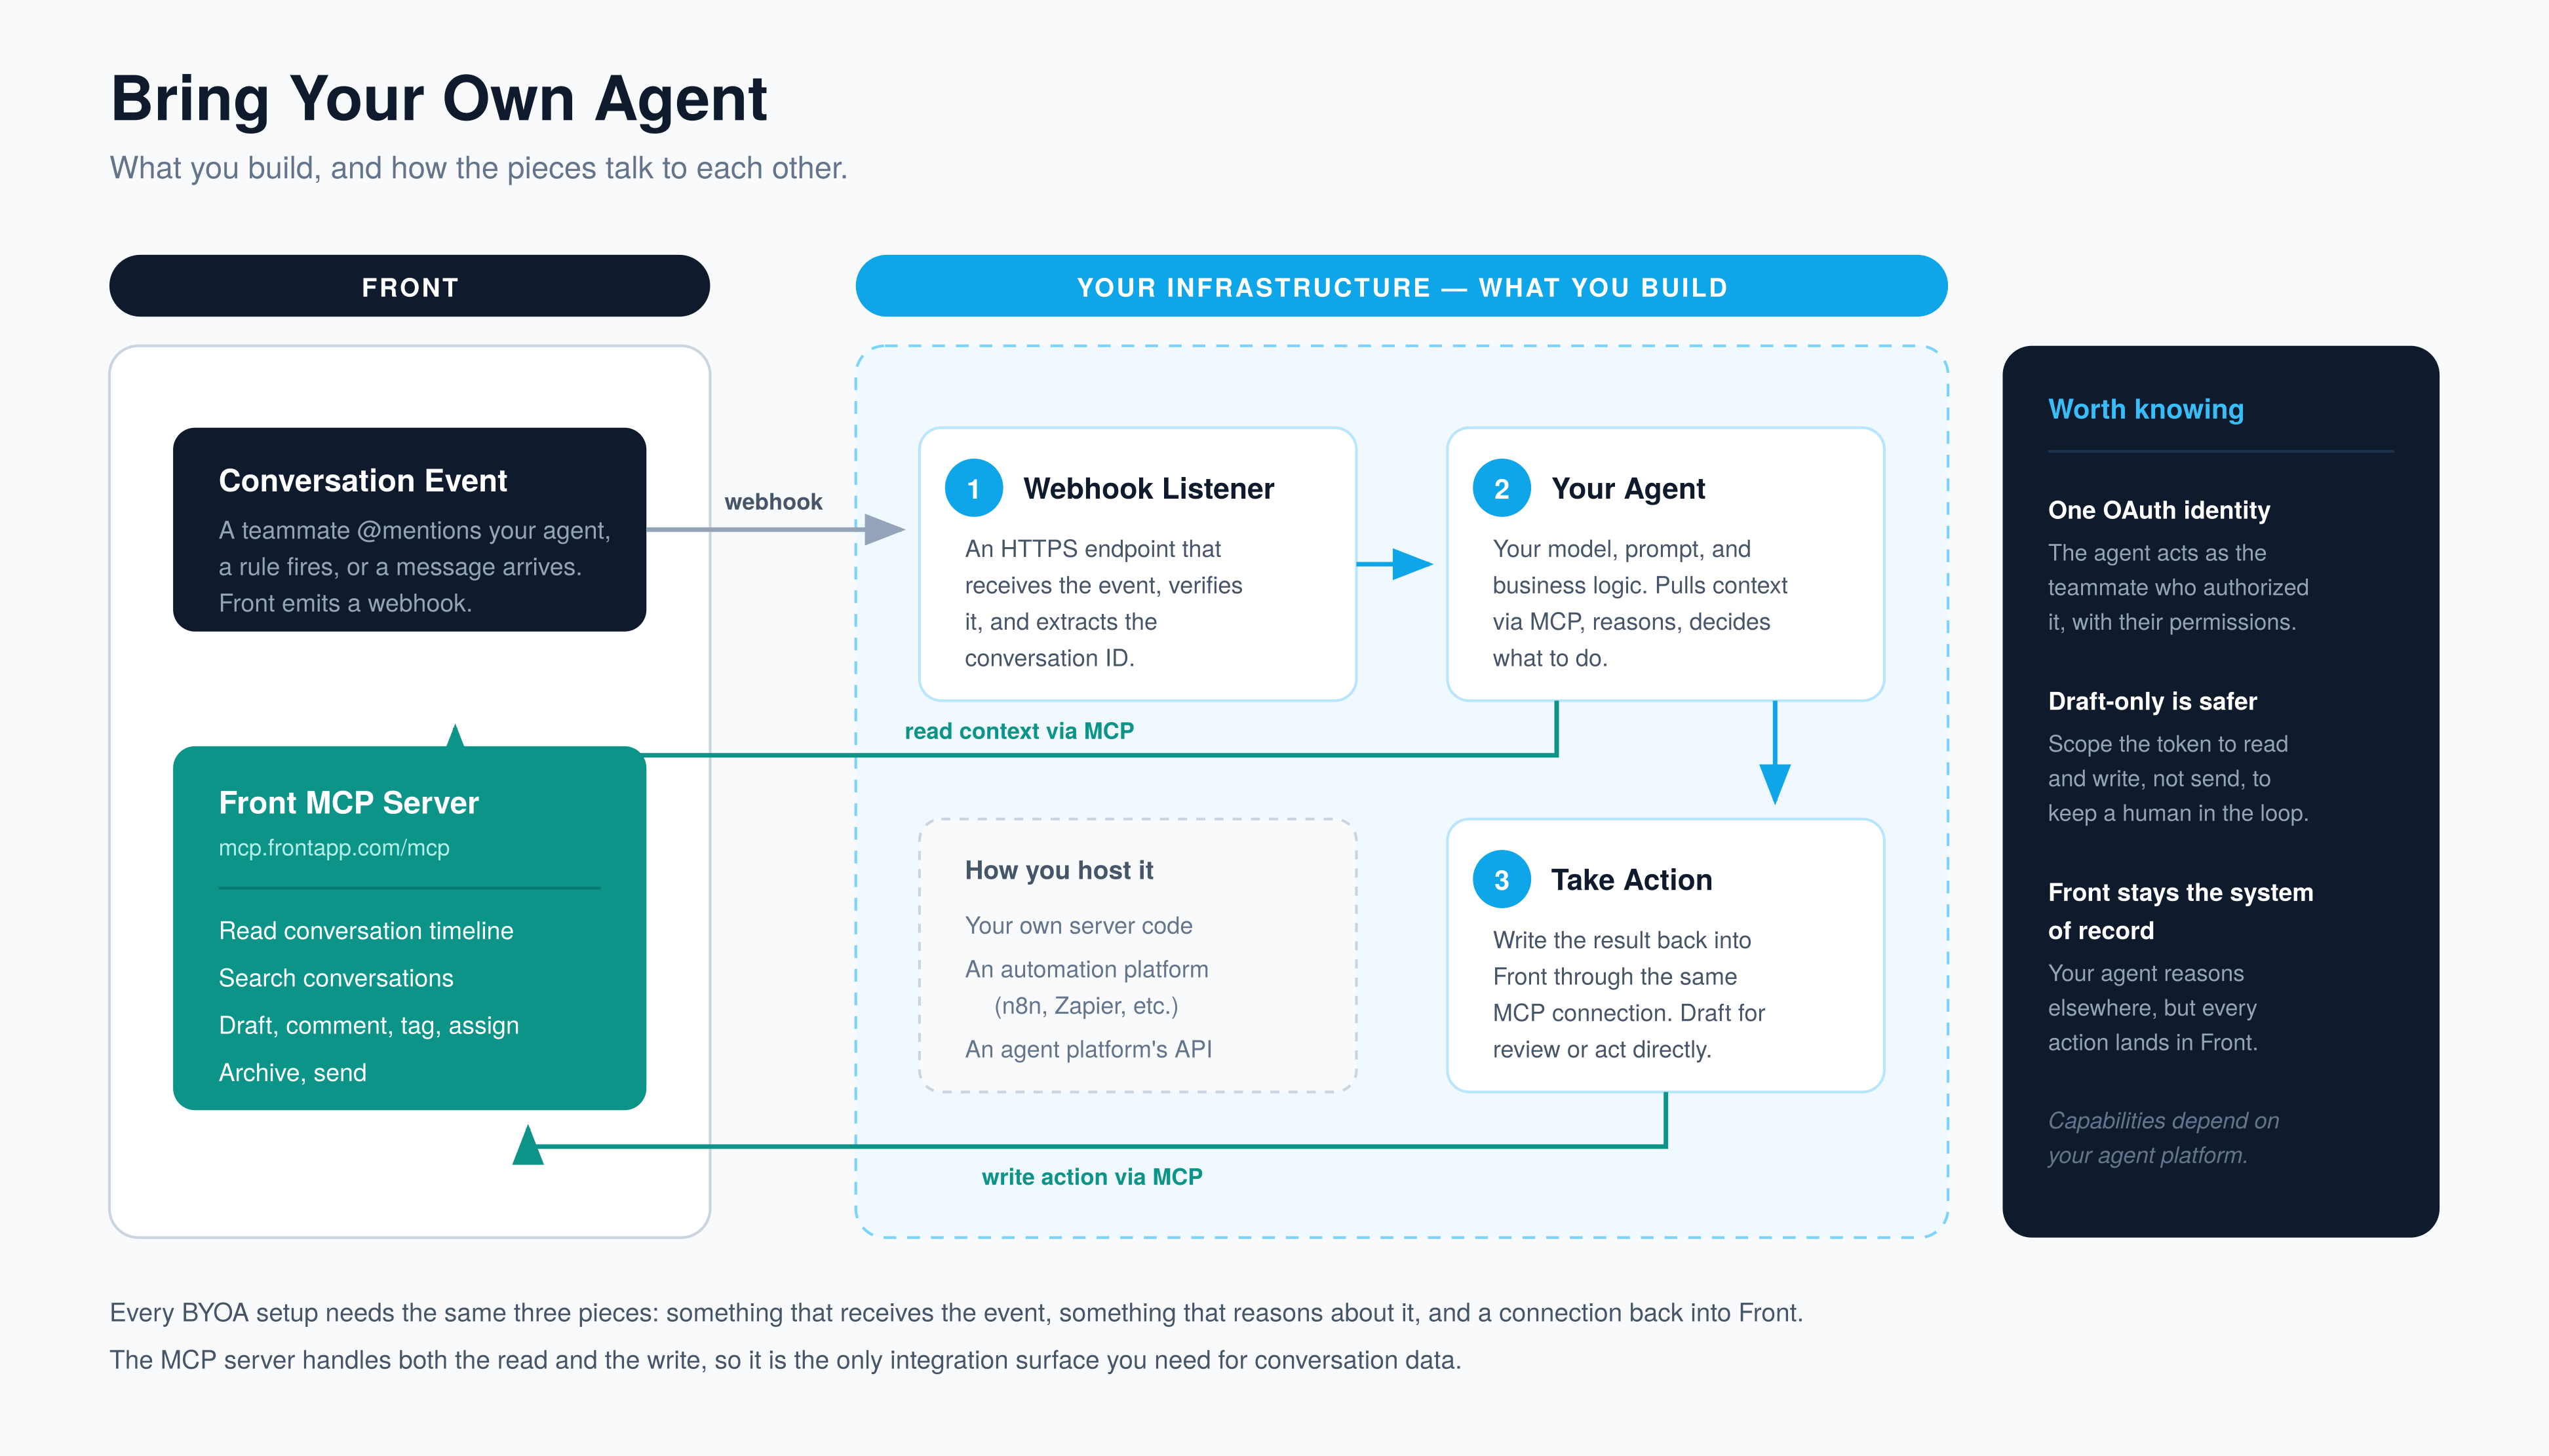
- A webhook receiver. An HTTPS server that Front calls whenever something relevant happens to a conversation your AI agent is involved in — an assignment, a new inbound message, an @mention, or an unassignment. The payload is intentionally thin: it tells your agent what happened and which conversation it concerns. Your server acknowledges the event and then kicks off the agent's work.
- An MCP client authorized via OAuth. Your agent exchanges its client credentials for a short-lived bearer token, then connects to Front's MCP server with that token to read the full conversation context and take actions — creating a draft reply, posting a comment, reassigning the conversation, and more. Every action is attributed to the AI agent's identity.
The sections below follow the setup wizard in Front's AI agent settings step by step, then cover each component in detail.
Step 1 — Create the AI Agent in Front
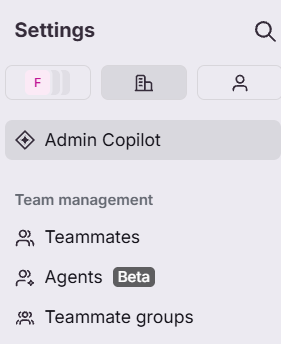
- Navigate to Settings → Company → Agents.
- Click Create AI agent to open the setup wizard.
Identity
- Enter a Name for your agent. Choose something that makes sense to customers if they'll see it — for example, the name your brand uses for its AI assistant. The name may be shown to external users depending on the channel.
- Upload an Avatar (optional). Visible inside Front only.
- Enter a Handle for the agent. This is an internal identifier used in assignment dropdowns and the teammate list, visible inside Front only.
- Enter a Role (optional). An internal label to help your team understand the agent's function, visible inside Front only.
AI Engine
-
Enter the Webhook URL where your server will receive events from Front — for example,
https://your-agent.example.com/webhook. Front will POST a signed request to this URL whenever something relevant happens to a conversation your agent is involved in: an assignment, a new inbound message, an @mention, or an unassignment. Your server must respond with a2xximmediately to acknowledge receipt; Front retries on failure. The payload is intentionally thin — it identifies what happened and which conversation it concerns, and your agent fetches full context from the MCP server afterward.See Step 2 — Implement Your Webhook Receiver below for the full payload shape, signature verification steps, and event types.
-
Copy and securely store the credentials Front displays on this screen — the client secret is shown only once:
Credential What it's for Signing secret Verifying that inbound webhook requests genuinely came from Front OAuth URL The workspace-specific token endpoint your agent calls to obtain a bearer token Client ID Your agent's OAuth client identifier Client secret Your agent's OAuth client secret Your agent uses the OAuth credentials to mint short-lived bearer tokens via the
client_credentialsgrant. Those tokens authorize all calls to Front's MCP server and are scoped to the AI agent's identity, so every action it takes is attributed to the agent, not to any human teammate.See Step 3 — Authenticate with OAuth below for the full token exchange flow and token lifecycle details.
Use these credentials if you want to connect Front's MCP server using this AI agent identityIf you want to connect Front's MCP Server to an AI assistant but want to authorize the connection on behalf of an AI agent instead of a human teammate, use the Client ID and secret provided on this screen and a grant type of
client_credentials. This will connect the MCP server through the AI agent's identity. If you connect in this fashion, you do not need to create a developer app in Front with an OAuth feature, as described in the MCP server article.
Permissions
- Select the workspaces your agent should have access to. Restrict it to only the workspaces relevant to its function.
- Configure the specific permissions within those workspaces. Permissions are grouped into categories covering actions like triaging, assisting, resolving, and managing resources. Grant only what the agent needs — an agent that only drafts replies for human review doesn't need permission to send or close conversations. You can adjust permissions after setup as you gain confidence in the agent's behavior.
Escalation
- Select the number of minutes of inactivity that should elapse before Front automatically unassigns the conversation. Choose a value that gives your agent enough time to complete a turn, with some buffer. This is a safety net that ensures customers are never left waiting indefinitely on an unresponsive agent.
- Click Create to finish setting up the agent.
Step 2 — Implement Your Webhook Receiver
Front delivers a signed HTTPS POST to your webhook URL whenever an event relevant to your AI agent occurs.
Verify the signature
Every request includes two headers you must validate before trusting the payload:
x-front-request-timestamp— the delivery time in millisecondsx-front-signature— a base64-encoded HMAC-SHA256 signature
- Read the raw request body before any JSON parsing — signature verification must operate on the raw bytes.
- Concatenate the timestamp, a colon, and the raw body (UTF-8 throughout):
baseString = `${timestamp}:` + rawBody - Compute HMAC-SHA256 over
baseStringusing your signing secret as the key, output as base64. - Compare the result against
x-front-signature. Reject the request if they don't match.
const baseString = Buffer.concat([
  Buffer.from(`${timestamp}:`, 'utf8'),
  rawBody
]).toString();
const hmac = crypto.createHmac('sha256', signingSecret)
  .update(baseString)
  .digest('base64');
const valid = hmac === signature;
Handle the payload
Payloads are intentionally thin — they identify what happened and where, not the full content.
Do not plan for a strict payload schemaThe payload might take on additive changes over time without advance communication. Any breaking changes, however, would be communicated with adequate time to handle the changes.
type | When it fires |
|---|---|
assign | The conversation is assigned to your AI agent. |
inbound | A new inbound message arrives on a conversation already assigned to your AI agent. Payload includes message_id but not comment_id. |
mention | Your AI agent is @mentioned in a conversation. Payload includes comment_id but not message_id. |
unassign | The conversation is unassigned or reassigned away — stop working. |
mention events carry a comment_id, and inbound events carry a message_id, pointing directly at the resource that triggered the event. When the AI agent is mentioned by a teammate, you'll receive the comment ID where the mention takes place. When a new conversation your agent is assigned to receives a new inbound message, you'll receive the message ID. Each field is only present on the event type it applies to; there's no null placeholder on the others.
{
  "event_id": "act_123",
  "type": "inbound",
  "teammate_id": "tea_abc",
  "conversation_id": "cnv_456",
  "message_id": "msg_789"
}{
"event_id": "act_123",
"type": "assign",
"teammate_id": "tea_abc",
"conversation_id": "cnv_456"
}{
"event_id": "act_123",
"type": "unassign",
"teammate_id": "tea_abc",
"conversation_id": "cnv_456"
}{
"event_id": "act_123",
"type": "mention",
"teammate_id": "tea_abc",
"conversation_id": "cnv_456",
"comment_id": "com_012"
}Acknowledge and deduplicate
- Return a
2xxresponse immediately to acknowledge receipt. Front retries on failure, so process the event asynchronously after acknowledging. - Deduplicate on the
event_idfield — Front delivers at-least-once. - After acknowledging, fetch the full conversation state from the MCP server using the
conversation_id. Do not rely on the webhook payload for content.
Step 3 — Authenticate with OAuth
Your server-side code authenticates with Front using the OAuth 2.0 client_credentials grant before making any MCP calls. Tokens are owned by the AI agent's identity — every MCP call made with the token is attributed to the agent, not any human.
Obtain a token
In your application code, implement a token-fetching function that POSTs to your workspace OAuth URL with the client credentials you copied in Step 1:
POST https://your-workspace.frontapp.com/oauth/token
Content-Type: application/x-www-form-urlencoded

grant_type=client_credentials
client_id=<FRONT_CLIENT_ID>
client_secret=<FRONT_CLIENT_SECRET>
The response returns a bearer access_token with a short TTL (~15 minutes):
{
  "access_token": "...",
  "token_type": "bearer",
  "expires_in": 900
}
Manage the token lifecycle
-
Store the token in memory alongside its expiry time — do not persist it to disk or cache it indefinitely.
-
Before each MCP session, check whether the token has expired and re-mint if needed by repeating the POST above. There is no refresh token in the
client_credentialsflow. -
Pass the bearer token in the
Authorizationheader on all MCP server requests:Authorization: Bearer <access_token>
Step 4 — Read Context and Take Actions via MCP
Once your agent has a bearer token, connect an MCP client to the MCP server URL Front provided during setup. For the full tool catalog and reference, see the Front MCP Server documentation.
Read conversation context
- Call
read_conversationwith theconversation_idfrom the webhook payload. This is the typical first call after receiving any event — it returns the full conversation timeline, messages, comments, assignee, and contact details your agent needs to decide what to do next. Useread_message,read_contact,read_account, andlist_teammatesto pull additional context as needed.
Take actions
- Based on what your agent decides, call the appropriate action tool. Common ones include
create_draftto queue a reply for human review,send_replyto respond directly,add_commentfor internal notes,assign_conversationto hand off, andupdate_conversation_statusto close or reopen.
All actions are bounded by the permissions you configured in the setup wizard. A call outside the agent's granted scope is rejected at the MCP layer.
As BYOA-specific tools are added to the MCP server, they'll be called out here.
Step 5 — Route Conversations to Your Agent
Your AI agent only receives webhook events for conversations it is assigned to or @mentioned in. With the agent created and your server running, the final step is to configure how conversations reach it.
- Set up rules in Front to automatically assign conversations to your AI agent based on conditions — inbox, tag, sender, subject line, or any other rule criteria. For example, a rule can assign every new inbound message in a specific inbox to your AI agent as soon as it arrives.
- Or assign manually — teammates can assign a conversation to your AI agent directly from the assignment dropdown, the same way they'd assign to a human.
- Use @mentions to invoke your agent on a specific conversation without full assignment, for tasks like drafting a response or posting a comment.
For full details on creating and managing rules in Front, see the Rules documentation.
Rate limits
Front limits how many operations your AI teammates can perform against your Front data each minute. This limit is separate from any other rate limit your company has, such as an API rate limit. An operation is any read or write, such as looking up a conversation, adding a comment, or creating a draft.
| Plan | Operations per minute |
|---|---|
| Starter | 50 |
| Professional | 200 |
| Enterprise | 800 |
- This allowance is shared across all of your AI teammates. Adding more agents doesn't add capacity, so several busy agents will work through it faster than one.
- Treat the figure as a minimum rather than a ceiling. Capacity refills continuously, so a short burst above it can succeed when your agents have been running below the limit.
If your agents reach the limit, they'll wait and retry automatically. You may notice a reply taking longer than usual, but nothing is lost. If it happens regularly, you likely need a higher plan, a rate limit add-on, or fewer agents competing for the same allowance.
For more details on plans and add-ons, visit our Pricing page.
Monitoring and improving the performance of your agent
After you set up your AI agent, Front provides various features to observe, govern, and improve your agent. To learn about these features, please refer to our Help Center article:
Updated 11 days ago